一、Data的xid
Data组件是前端model上的数据核心,xid是Data组件的唯一标识,它的命名规则必须符合JS变量命名规则,因为Data组件为简化感知组件引用data的写法直接在model上使用xid存放了Data的对象实例,这样引用数据就可以使用model.xid的方式了,当然同样也支持model.comp(xid)的常规写法;
  <input component="$UI/system/components/justep/input/input" class="form-control"
            bind-ref="fruitData.ref('fName')"/>
  <input component="$UI/system/components/justep/input/input" class="form-control"
            bind-ref="comp('fruitData').ref('fName')"/>
两种写法是等效的,但是显然第一种方式更简单直接
二、Data的列
- Data组件的列定义
列定义包括:name、type、label,
name:列的唯一标识
type:列的数据类型,取自范围:String、Integer、Long、Float、Double、Decimal、Boolean、Date、Time、DateTime
label:列显示名称,当没有定义时,label为name
另外Data组件上还有一个重要的属性idColumn,用来指定Data数据中行ID的表示列,可以理解为关系型数据库中表上定义的key关系
    <div xid="fruitData" component="$UI/system/components/justep/data/data"
      idColumn="fID" autoLoad="true">
      <column label="ID" name="fID" type="String"/>
      <column label="显示名称" name="fName" type="String"/>
      <column label="重量" name="fWeight" type="Double"/>
      <data>
        [{"fName":"苹果","fID":"apple","fWeight":100},
         {"fName":"梨","fID":"pear","fWeight":80},
         {"fName":"西瓜","fID":"watermelon","fWeight":1800},
         {"fName":"香蕉","fID":"banana","fWeight":3600}]
      </data>
    </div>
相关的属性和API:
属性:
Data.defCols:存放列的定义信息
Data.idColumn
代码示例:
  var data = this.comp('fruitData');
  var IDColDef = data.defCols[data.idColumn];//获取ID列的定义
  alert(data.idColumn+' label:'+IDColDef.label+',name:'+IDColDef.name+',type:'+IDColDef.type);
取值赋值相关API:
Data.getValue(col,row);
Data.setValue(col,value,row);
Row.val(col,value);
获取数据时会根据列定义进行数据的转换,目前支持string—>Integer、Long、Float、Double、Decimal、Date、Time、DateTime转化,当转换失败时返回Data.ErrorValue对象,通过ErrorValue.value可以获取原值
代码示例:
  var data = this.comp('fruitData');
  //给fWeight设置字符数据
  data.setValue('fWeight','200');
  var v = data.getValue('fWeight');
  alert('fWeight:('+typeof(v)+')'+v);
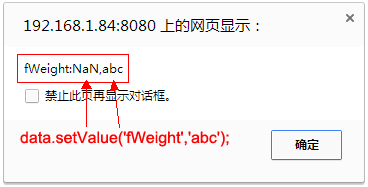
  //给fWeight设置字符数据'abc'非有效的数值字符串
  data.setValue('fWeight','abc');
  v = data.getValue('fWeight');
  alert('fWeight:'+v+','+v.value);
获取列显示名相关API:
Data.label(col);
Row.label(col);
<label bind-text="fruitData.label('fName')"/>
获取行ID相关API:
Data.getRowID(row);
Data.getValue(Data.idColumn);
Row.getID();
代码示例:
  //三种方式获取行ID
  var data = this.comp('fruitData');
  var v = data.getValue(data.idColumn);
  var crow = data.getCurrentRow();
  var id1 = data.getRowID(crow);
  var id2 = crow.getID();
  alert('rowid:'+id1+','+v+','+id2);
- 列类型和规则的关系
当列的type为Integer、Long、Float、Double、Decimal、Date、Time、DateTime时会增加数据格式的规则校验;
  <div component="$UI/system/components/justep/labelEdit/labelEdit" class="x-label-edit x-label20">
    <label class="x-label" bind-text="fruitData.label('fWeight')"/>
    <input component="$UI/system/components/justep/input/input"
      class="form-control x-edit" bind-ref="fruitData.ref('fWeight')"/>
  </div>
fruitData的fWeight列type为Double,当输入非数字时会出现错误提示
- 列类型和input组件的关系
列类型和Input组件同样有着密切关系,不同类型会影响input的行为和展现,当列的type为Integer、Long、Float、Double、Decimal时,Input组件会自动加上输入控制,只允许输入数字类型;当列的type为Date、Time、DateTime时,Input组件会启用日期时间选择器进行数据修改
三、初始化加载状态
Data组件上有两个关于初始化加载状态属性:autoLoad、autoNew,表示当功能页面打开后data组件的状态,两个属性是互斥的;
当autoLoad=true时,Data组件在model的onModelConstructing时执行open操作,当autoNew=true时,Data组件在model的onModelConstructing时执行newData操作;
注:data定义的静态数据需要autoLoad=true才进行加载,否则需要主动调用open方法加载
四、Data的行对象
Data组件上的数据是二维表结构,即行列结构,上面介绍了列现在我们来看看行对象
首先Data组件的数据存放在Data.datas上,Data.datas是可观察的数组(关于可观察的数组请查阅数据绑定的文章,这里我们就把他理解成简单的数组),数组上的每一个项就是行。通过行上扩展parent和children,很轻松就扩展出了Tree型数据结构(关于data的tree我们后面文章再详细介绍)。
通过上图我们能看到调试器中datas存放的行对象实例
Data.Row常用API:
Row.ref(col);---------获取对应列的可观察数据对象,主要使用在感知组件的bind-ref
Row.val(col);---------获取对应列的值,等价于Data.getValue(col,row)
Row.label(col);-------获取对应列的显示名
Row.index();----------获取行的索引号
Row.parent();---------获取行的父
Row.children();-------获取行的子
五、Data的数据游标
Data组件的游标指的就是Data组件的当前行,即:Data.currentRow,所有API和组件数据引用在没有显示指定行参数时使用的都是当前游标行
相关API:
Data.getCurrentRow();---------获取当前行
Data.to(row);-----------------滚动游标
Data.first();-----------------游标到首行
Data.last();------------------游标到末尾行
Data.next();------------------游标到下一行
Data.pre();-------------------游标到前一行
案例通过Data.getCurrentRow()指定list组件中当前行的样式使用class:x-currentRow
<div component="$UI/system/components/justep/list/list" class="x-list" data="fruitData">
    <div class="x-list-template">
        <div component="$UI/system/components/bootstrap/row/row" class="row"
          bind-css="{'x-currentRow':$object==$model.fruitData.getCurrentRow()}" style="padding: 6px 0;">
           <div class="col col-xs-4">
               <input component="$UI/system/components/justep/input/input" class="form-control"
                 bind-ref="ref('fID')"/>
           </div>
           <div class="col col-xs-4">
               <input component="$UI/system/components/justep/input/input" class="form-control"
                 bind-ref="ref('fName')"/>
           </div>
           <div class="col col-xs-4">
               <input component="$UI/system/components/justep/input/input" class="form-control"
                 bind-ref="ref('fWeight')"/>
           </div>
        </div>
    </div>
</div>
本文由WeX5君整理,WeX5一款开源免费的html5开发工具,H5 App开发就用WeX5!
阅读其他app 开发相关文章:http://doc.wex5.com/?p=3443


但愿可以看懂
似懂非懂,还是不懂呗
想睡觉
看不懂
既然是教程 写的没头没脑的 凑字数呢阿
一头雾水啊。。。。看来修行不够 ~~~~(>_<)~~~~